
Vietnam’s e-visa application form lives at evisa.gov.vn — that is the only official portal, everything else is a paid middleman. The fee is $25 for a single-entry visa and $50 for multiple-entry, payable by a non-Vietnamese Visa or Mastercard. Most first-time travelers finish the form in 20-30 minutes if their documents are already on the desktop, and the visa lands in their inbox within 3-5 working days. I have walked dozens of friends and travelers through this process from Da Nang, so this guide is built around the parts that actually trip people up, not a copy of every field label.
The trick is that the form looks intimidating because everything is in English bureaucratese, but most fields are straightforward. The handful that aren’t are the ones I’ll spend the most time on below.
What to have ready before you open the portal
Trying to find documents while a session is open is the easiest way to get logged out and start over. Spend five minutes before you start and put these in one folder:
- A passport valid for at least six months past your planned entry date. Don’t gamble on shorter validity — even though some travelers report being let in with less, immigration officers can deny boarding at your home airport.
- A clear color scan of your passport’s photo page. JPG, no glare, all four corners visible. Anything cropped will be flagged.
- A recent photo of your face. White background, no glasses, no hat, neutral expression, under 2 MB. The most common rejection reason for the entire application is the photo background not being white enough. If you have any doubt, run it through a background-removal tool first.
- A non-Russian Visa or Mastercard. This is non-negotiable for travelers from countries with payment restrictions — the portal refuses Russian-issued cards and most local-only payment systems. A friend, partner, or relative paying on your behalf is fine.
- A rough itinerary. Approximate entry date, length of stay (up to 90 days), the city you’ll land in, and a hotel name there. No booking confirmation is checked, but the address field is mandatory.
Once these are on your desktop, the rest is mostly typing. For broader context on the e-visa rules themselves, see our Vietnam e-visa overview — it covers extensions, multiple-entry use cases, and country eligibility.
Uploading your portrait and passport scan
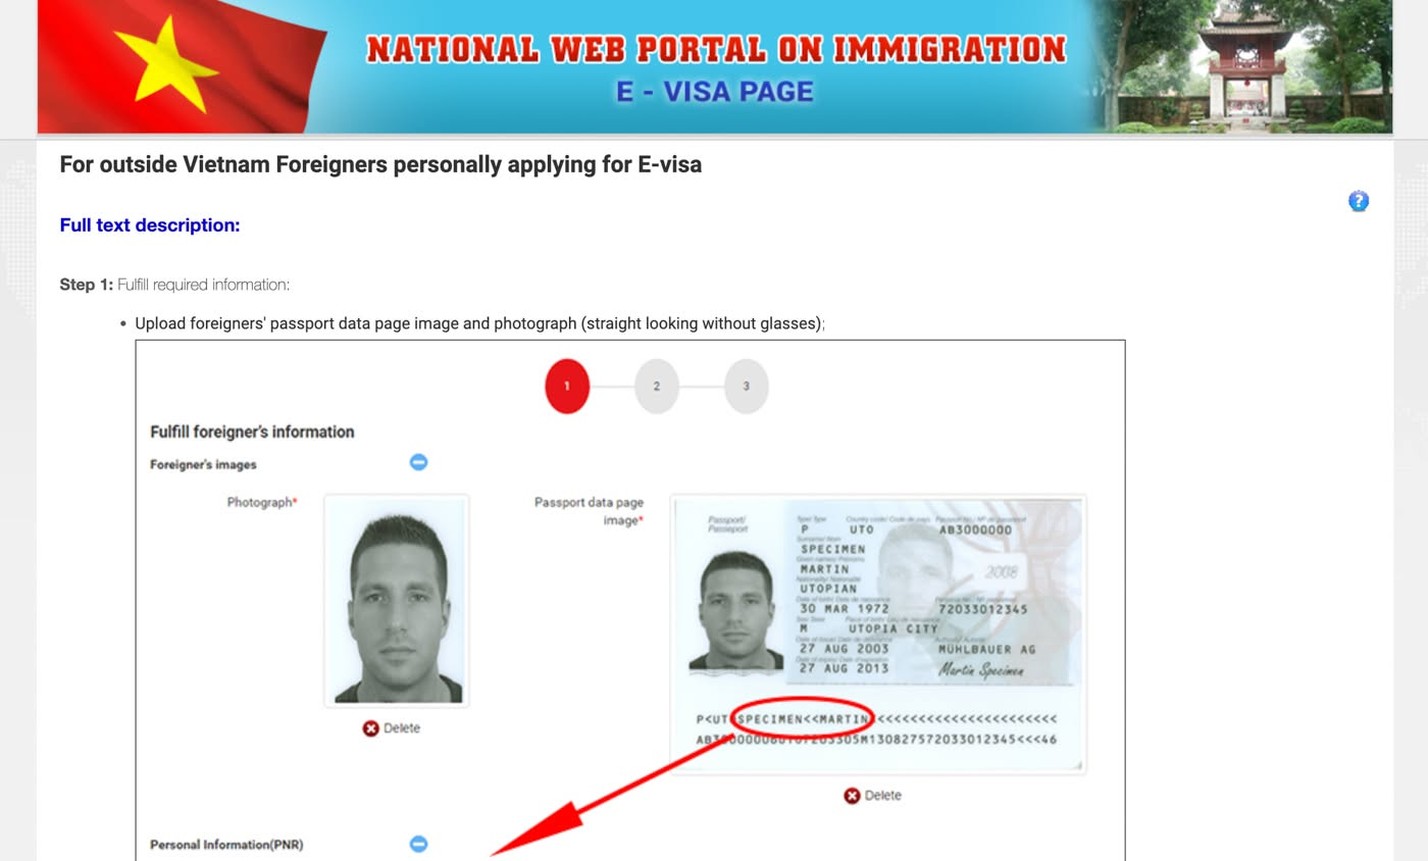
The first section of the form is FOREIGNER'S IMAGES. Two files: a portrait photo and the scan of your passport’s photo page. Both fields show a green checkmark once the upload is accepted.

A red error here means one of three things: the file is too big, the format is wrong, or the background of your portrait isn’t pure white. If the portrait is the issue, the cleanest fix is to drop the original photo into a background-removal site and download the result on a white canvas. Don’t waste an hour fighting with the original.
The passport scan needs the entire photo page, including the machine-readable zone at the bottom. Bend the cover back so nothing is shadowed, lay the page flat, and shoot straight down.
The photo and scan step is where most rejections start — a background that isn’t quite white, a page shot at the wrong angle — and you don’t find out until after you’ve paid. My team in Da Nang has walked hundreds of travelers through this exact form, so I can look yours over before you hit submit. Message me on Telegram and I’ll flag anything that would bounce it before you pay the $25 fee.
Filling in your personal information without errors
The PERSONAL INFORMATION section is where the form catches the most mistakes. The rule for every field with a name in it is simple: copy character-for-character from the Latin transliteration in your passport. Do not retranslate, do not add diacritics, do not change capitalization.

- Surname. Exactly as the top row of your passport shows it, in uppercase Latin.
- Middle and given name. Only what is in the Latin section of your passport. If your middle name is only spelled in your native script, leave it out.
- Date of birth. Pick the “Full” option, then enter day, month, year. The calendar is small — double-check after you close it.
- Sex. Male or Female only.
- Nationality. Choose from the dropdown that matches the country printed in your passport.
- Religion. A mandatory field that no one verifies.
NONEis the safest entry if you don’t want to think about it. - Place of birth. Country is enough. Don’t add a city or region unless you want to introduce a typo risk.
- Email. The visa PDF will be sent here, and the form makes you type it twice — copy-paste is disabled. Use a mailbox you can actually open from your phone.
Three Yes/No questions follow about previous entries, dual nationality, and past violations of Vietnamese law. Answer honestly. The “ever used another passport to enter Vietnam” question matters only if you have a renewed passport from a previous visit.
Picking the visa type and exact dates
The REQUESTED INFORMATION section has the single most expensive trap in the entire form: a field called Intended length of stay in Viet Nam. It often defaults to 30 days. If you leave it there, your visa will be issued for 30 days even if you set the validity range to 90 days above. Travelers who miss this end up paying overstay fines on the way out — the cost breakdown for fixing one at the Lao Bao border is in our overstay guide
.
For most first-time visitors:
- Single-entry is enough. Pick multiple-entry only if you’re already planning a short trip to Laos, Cambodia, or Thailand and a return to Vietnam within 90 days.
- Grant e-Visa valid from is your arrival date. You cannot enter before this.
- To is your validity end date — up to 90 days after the start. Use a date calculator if you’re not sure.
- Type is
TOURISTfor sightseeing, beaches, food tours, and visits with friends. The other categories require sponsoring documents.
Change Intended length of stay to the actual number of days you want, capped at 90. This is the field that catches everyone.
Contact details, addresses, and your in-country plan
The CONTACT INFORMATION section asks for your home address, not your hotel in Vietnam. Use the format COUNTRY, CITY, STREET NUMBER, APT, all in Latin characters. A telephone number in international format with the country code is required.
The Emergency contact is mandatory and must be a real person reachable in your home country. Include their full name, address, phone, and relationship. The relationship field is free text — write MOTHER, FATHER, SPOUSE, FRIEND, BROTHER, SISTER, or COLLEAGUE in English.
In the INFORMATION ABOUT THE TRIP section:
- Purpose of entry.
TOURISMcovers everything a first-time traveler is doing. - Intended date of entry. Same as or after the visa start date.
- Residential address in Viet Nam. A real hotel name and city is enough —
Bamboo Beach Resort, Mui Neworks. No booking proof is needed, and you can change hotels later. - Province, district, ward. Look up the hotel on Google Maps and copy the administrative divisions from there. If a ward isn’t in the dropdown, pick the closest match.
- Border gates of entry and exit. Choose the airport you’re landing at, and the one you’re leaving from. If you plan a land crossing to Laos or Cambodia, you must list the official border gate (Lao Bao, Moc Bai, Bo Y, or Ha Tien) — visa-free crossings at other points are not allowed on an e-visa. If you’re already thinking about a longer stay or relocation, our moving to Vietnam guide covers what comes after a 90-day tourist run.
The OCCUPATION and TRIP'S EXPENSES sections are entirely optional. Skip them unless you enjoy filling forms.
After you click pay: registration code, waiting, and what to print
The very last field is a long sentence beginning I hereby declare that the above statements are true.... Check the box. Without it, the Next button stays grey.
The next screens are the payment flow:
- Review the summary screen. After this point you cannot edit the application.
- Enter your card details and pass any 3D-Secure check from your bank.
- Save the registration code that appears on the success screen — it looks like
E24XXXXXXXXX. Take a screenshot immediately. The code is rarely emailed. - Note the date — your three working days start tomorrow if you submitted after Vietnam business hours.
- Use the Search section of the same portal to check status using your registration code, email, and date of birth.
Processing usually takes 3-5 working days, longer during Tet (Lunar New Year, late January or February) and the April 30 holiday. A status of Granted Visa means a PDF is ready to download. Denied will list a reason, usually photo or passport image quality. Needs correction means re-upload one file.
Print the PDF. Phones run out of battery, and a paper copy at the immigration desk takes thirty seconds to scan and stamp.
If you’d like a second pair of eyes on your application before you pay the $25 fee, message the manager on Telegram @vietnam_samurai and I’ll send back a quick checklist for your trip profile. Or reach out on Telegram for direct answers about visas, moving to Vietnam, or anything else about the country.